iOS SQLite Database in Swift
SQLite is a Relational Database Management System and we can use SQLite is the type of Embedded file in our iOS applications because it will available as a library. For SQLite there is no stand-alone server running in the background like SQL server, Oracle or MySQL server. We have to handle all the operations within the app through various functions provided by SQLite library.
Now we will see how to use SQLite database in iOS swift applications with example.
Create iOS SQLite App in Swift
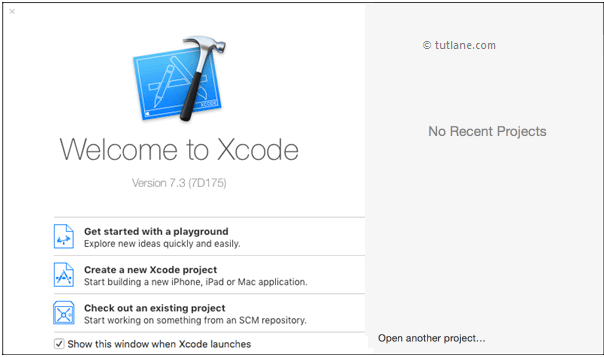
To create new project in iOS open Xcode from /Applications folder directory. Once we open Xcode the welcome window will open like as shown below. In welcome window click on the second option “Create a new Xcode Project” or choose File à New à Project.
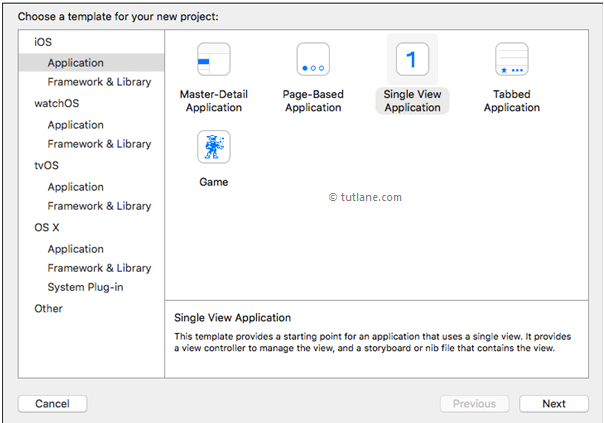
After selecting “Create a new Xcode project” a new window will open in that we need to choose template.
The new Xcode window will contain several built-in app templates to implement common type of iOS apps like page based apps, tab-based apps, games, table-view apps, etc. These templates are having pre-configured interface and source code files.
For this iOS SQLite example, we will use most basic template “Single View Application”. To select this one, Go to the iOS section in left side à select Application à In main area of dialog select “Single View Application” and then click on next button like as shown below.
After click Next we will get window like as shown below, in this we need to mention project name and other details for our application.
Product Name: “SQLite Database with iOS Swift”
The name whatever we enter in Product Name section will be used for the project and app.
Organization Name: “Tutlane”
You can enter the name of your organization or your own name or you can leave it as blank.
Organization Identifier: “com.developersociety”
Enter your organization identifier in case if you don't have any organization identifier enter com.example.
Bundle Identifier: This value will generate automatically based on the values we entered in Product Name and Organization Identifier.
Language: “Swift”
Select language type as “Swift” because we are going to develop applications using swift.
Devices: “Universal”
Choose Devices options as Universal it means that one application is for all apple devices in case if you have any specific requirement to run app only for iPad then you can choose the iPad option to make your application restricted to run only on iPad devices.
Use Core Data: Unselected
This option is used for database operations. In case if you have any database related operations in your application select this option otherwise unselect the option.
Include Unit Tests: Unselected
In case if you need unit tests for your application then select this option otherwise unselect it.
Include UI Tests: Unselected
In case if you need UI tests for your application then select this option otherwise unselect it.
Once you finished entering all the options then click on Next button like as shown below.
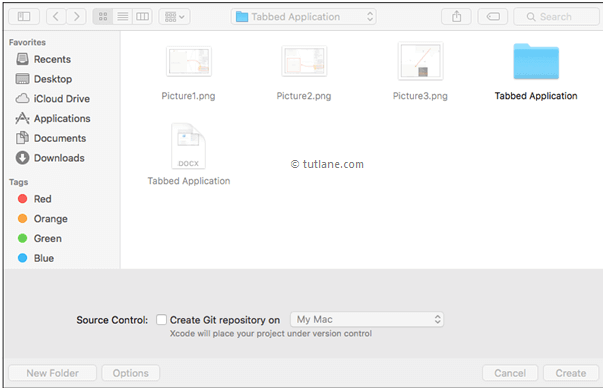
Once we click on Next button new dialog will open in that we need to select the location to save our project. Once you select the location to save project then click on Create button like as shown below.
After click on Create button the Xcode will create and open a new project. In our project Main.storyboard and ViewController.swift are the main files which we used to design app user interface and to maintain source code.
Main.storyboard - Its visual interface editor and we will use this file to design our app user interface.
ViewController.swift - It contains source code of our application and we use this file to write any code related to our app.
Now in project select Main.storyboard file the Xcode will open visual interface editor like as shown below.
Now select ViewController.swift file in your project that view will be like as shown below.
Now we will add Navigation controller to Viewcontroller in storyboard file for that go to Main.storyboard file click on ViewController à Go to Editor à Embed In à Click on Navigation Controller like as shown below
Add iOS UI Controls to View in Swift
Now we will add controls to our application for that open Object Library. The Object Library will appear at the bottom of Xcode in right side. In case if you don't find Object library, click on the button which is at the third position from the left in the library selector bar like as shown below. (Alternatively you can choose View à Utilities à Show Object Library.)
As we discussed our user interface will be in Main.storyboard file so open Main.storyboard file. Now in Object library search for Table View in Filter field then drag and drop Table View into Main.storyboard ViewController like as shown below.
Now we will change table view Prototype cell property for that click on table view you will see Prototype cells property in right side and set Prototype cells to “1” like as shown below.
Now drag three labels and one button and give the title name “Employee Name” and give the name “Edit” and “Delete”.
Now click on table view cell and set identifier name as “cell” like as shown below
Now search for ViewController in object library filter filed then drag and drop ViewController into Main.storyboard file like as shown below.
Now click on title bar of newly added ViewController to change the text and if you want to change the color of background Bar then you can easily select the background color and change it like as shown below.
Now in our new Third ViewController drag and drop two labels, text fields and one button control like as shown below
Now our Main.storyboard file will contain three Controllers like as shown below
Now we will make connection between insert button in first viewcontroller and third viewcontroller for that press Ctrl button in keyboard then drag insert button into third ViewController and give the identifier name as “insertSegue” like as shown below.
Follow the same step for Edit button and give the segue identifier “editSegue”.
Now go to File option à then click on New à then click on File button like as shown below.
Now choose “Cocoa Touch Class” and click on Next button like as shown below.
Give the class name and extend with subclass “UITABLEVIEWCELL” and set the language swift. Now click on Next button to create new class file like as shown below.
Now click on Table View Cell and attach the class “StudentCell” like as shown below.
Connect iOS UI Controls to Code in Swift
Now we will make connection between controls and ViewController.swift code for that click on assistant button (overlap circle) in Xcode toolbar right side corner like as shown below
To map the controls, press Ctrl button in keyboard and drag edit, delete buttons and table view from view controller and drop into ViewController.swift file like as shown below
Now click on project go to Build Phases à Click on “Link Binary with Libraries” à Click on “+” and add the “libsqlite3.0.tbd” like as shown below.
Once we done all the settings we need to write custom code in ViewController.swift file like as shown below
import UIKit
class ViewController: UIViewController, UITableViewDataSource, UITableViewDelegate {
var marrStudentData : NSMutableArray!
@IBOutlet weak var tbStudentData: UITableView!
override func viewDidLoad() {
super.viewDidLoad()
// Do any additional setup after loading the view.
}
override func viewWillAppear(animated: Bool) {
self.getStudentData()
}
override func didReceiveMemoryWarning() {
super.didReceiveMemoryWarning()
// Dispose of any resources that can be recreated.
}
//MARK: Other methods
func getStudentData()
{
marrStudentData = NSMutableArray()
marrStudentData = ModelManager.getInstance().getAllStudentData()
tbStudentData.reloadData()
}
//MARK: UITableView delegate methods
func tableView(tableView: UITableView, numberOfRowsInSection section: Int) -> Int {
return marrStudentData.count
}
func tableView(tableView: UITableView, cellForRowAtIndexPath indexPath: NSIndexPath) -> UITableViewCell {
let cell:StudentCell = tableView.dequeueReusableCellWithIdentifier("cell") as! StudentCell
let student:StudentInfo = marrStudentData.objectAtIndex(indexPath.row) as! StudentInfo
cell.lblContent.text = "Name : \(student.Name) \n Marks : \(student.Marks)"
cell.btnDelete.tag = indexPath.row
cell.btnEdit.tag = indexPath.row
return cell
}
//MARK: UIButton Action methods
@IBAction func btnDeleteClicked(sender: AnyObject) {
let btnDelete : UIButton = sender as! UIButton
let selectedIndex : Int = btnDelete.tag
let studentInfo: StudentInfo = marrStudentData.objectAtIndex(selectedIndex) as! StudentInfo
let isDeleted = ModelManager.getInstance().deleteStudentData(studentInfo)
if isDeleted {
Util.invokeAlertMethod("", strBody: "Record deleted successfully.", delegate: nil)
} else {
Util.invokeAlertMethod("", strBody: "Error in deleting record.", delegate: nil)
}
self.getStudentData()
}
@IBAction func btnEditClicked(sender: AnyObject)
{
self.performSegueWithIdentifier("editSegue", sender: sender)
}
//MARK: Navigation methods
override func prepareForSegue(segue: UIStoryboardSegue, sender: AnyObject?) {
if(segue.identifier == "editSegue")
{
let btnEdit : UIButton = sender as! UIButton
let selectedIndex : Int = btnEdit.tag
let viewController : InsertRecordViewController = segue.destinationViewControlleras! InsertRecordViewController
viewController.isEdit = true
viewController.studentData = marrStudentData.objectAtIndex(selectedIndex) as! StudentInfo
}
}
}
Now go to File option à then click on New à then click on file option like as shown below
 '
'
Now choose “Cocoa Touch Class” and click on Next button like as shown below.
Give the class name and extend with subclass “UIViewController” and set the language swift and click on next button to create new class file.
Now embed newly created class to third View Controller like as shown below.
Open the third viewcontroller in Assistant mode by click on overlap circle icon at top right side and make connection between text fields and the button like as shown below.
Once we done our settings our InsertRecordViewController.swift file should contain code like as shown below.
import UIKit
class InsertRecordViewController: UIViewController {
@IBOutlet weak var FirstName: UITextField!
@IBOutlet weak var LastName: UITextField!
var isEdit : Bool = false
var employeeData : StudentInfo!
override func viewDidLoad() {
super.viewDidLoad()
if(isEdit)
{
FirstName.text = studentData.Name;
LastName.text = studentData.Marks;
}
// Do any additional setup after loading the view.
}
override func didReceiveMemoryWarning() {
super.didReceiveMemoryWarning()
// Dispose of any resources that can be recreated.
}
//MARK: UIButton Action methods
@IBAction func btnBackClicked(sender: AnyObject)
{
self.navigationController?.popViewControllerAnimated(true)
}
@IBAction func btnSaveClicked(sender: AnyObject)
{
if(FirstName.text == "")
{
Util.invokeAlertMethod("", strBody: "Please enter student name.", delegate: nil)
}
else if(LastName.text == "")
{
Util.invokeAlertMethod("", strBody: "Please enter student marks.", delegate: nil)
}
else
{
if(isEdit)
{
let studentInfo: StudentInfo = StudentInfo()
studentInfo.RollNo = studentData.RollNo
studentInfo.Name = FirstName.text!
studentInfo.Marks = LastName.text!
let isUpdated = ModelManager.getInstance().updateStudentData(studentInfo)
if isUpdated {
Util.invokeAlertMethod("", strBody: "Record updated successfully.", delegate: nil)
} else {
Util.invokeAlertMethod("", strBody: "Error in updating record.", delegate: nil)
}
}
else
{
let studentInfo: StudentInfo = StudentInfo()
studentInfo.Name = FirstName.text!
studentInfo.Marks = LastName.text!
let isInserted = ModelManager.getInstance().addStudentData(studentInfo)
if isInserted {
Util.invokeAlertMethod("", strBody: "Record Inserted successfully.", delegate: nil)
} else {
Util.invokeAlertMethod("", strBody: "Error in inserting record.", delegate: nil)
}
}
self.navigationController?.popViewControllerAnimated(true)
}
}
}
Now go to File option à then click on New à then click on File option like as shown below.
Now choose “Swift Class” and click on Next button like as shown below.
Give name as “Model Manager” and click on create button like as shown below.
We need to write custom code in ModelManager.swift file to use SQLite database in our applications like as shown below
import UIKit
let sharedInstance = ModelManager()
class ModelManager: NSObject {
var database: FMDatabase? = nil
class func getInstance() -> ModelManager
{
if(sharedInstance.database == nil)
{
sharedInstance.database = FMDatabase(path: Util.getPath("Student.sqlite"))
}
return sharedInstance
}
func addStudentData(studentInfo: StudentInfo) -> Bool {
sharedInstance.database!.open()
let isInserted = sharedInstance.database!.executeUpdate("INSERT INTO student_info (Name, Marks) VALUES (?, ?)", withArgumentsInArray: [studentInfo.Name, studentInfo.Marks])
sharedInstance.database!.close()
return isInserted
}
func updateStudentData(studentInfo: StudentInfo) -> Bool {
sharedInstance.database!.open()
let isUpdated = sharedInstance.database!.executeUpdate("UPDATE student_info SET Name=?, Marks=? WHERE RollNo=?", withArgumentsInArray: [studentInfo.Name, studentInfo.Marks, studentInfo.RollNo])
sharedInstance.database!.close()
return isUpdated
}
func deleteStudentData(studentInfo: StudentInfo) -> Bool {
sharedInstance.database!.open()
let isDeleted = sharedInstance.database!.executeUpdate("DELETE FROM student_info WHERE RollNo=?", withArgumentsInArray: [studentInfo.RollNo])
sharedInstance.database!.close()
return isDeleted
}
func getAllStudentData() -> NSMutableArray {
sharedInstance.database!.open()
let resultSet: FMResultSet! = sharedInstance.database!.executeQuery("SELECT * FROM student_info", withArgumentsInArray: nil)
let marrStudentInfo : NSMutableArray = NSMutableArray()
if (resultSet != nil) {
while resultSet.next() {
let studentInfo : StudentInfo = StudentInfo()
studentInfo.RollNo = resultSet.stringForColumn("RollNo")
studentInfo.Name = resultSet.stringForColumn("Name")
studentInfo.Marks = resultSet.stringForColumn("Marks")
marrStudentInfo.addObject(studentInfo)
}
}
sharedInstance.database!.close()
return marrStudentInfo
}
}
Now follow the same step create the new file choose swift file à give the name “EmployeeInfo” and click on create button after file created. Add the following code into the “EmployeeInfo.”
import UIKit
let sharedInstance = ModelManager()
class ModelManager: NSObject {
var database: FMDatabase? = nil
class func getInstance() -> ModelManager
{
if(sharedInstance.database == nil)
{
sharedInstance.database = FMDatabase(path: Util.getPath("Employee.sqlite"))
}
return sharedInstance
}
func addStudentData(studentInfo: StudentInfo) -> Bool {
sharedInstance.database!.open()
let isInserted = sharedInstance.database!.executeUpdate("INSERT INTO employee_info (FirstName, LastName) VALUES (?, ?)", withArgumentsInArray: [studentInfo.Name, studentInfo.Marks])
sharedInstance.database!.close()
return isInserted
}
func updateStudentData(studentInfo: StudentInfo) -> Bool {
sharedInstance.database!.open()
let isUpdated = sharedInstance.database!.executeUpdate("UPDATE employee _info SET FirstName=?, LastName=? WHERE id=?", withArgumentsInArray: [studentInfo.Name, studentInfo.Marks, studentInfo.RollNo])
sharedInstance.database!.close()
return isUpdated
}
func deleteStudentData(studentInfo: StudentInfo) -> Bool {
sharedInstance.database!.open()
let isDeleted = sharedInstance.database!.executeUpdate("DELETE FROM employee_info WHERE id=?", withArgumentsInArray: [studentInfo.RollNo])
sharedInstance.database!.close()
return isDeleted
}
func getAllStudentData() -> NSMutableArray {
sharedInstance.database!.open()
let resultSet: FMResultSet! = sharedInstance.database!.executeQuery("SELECT * FROM employee_info", withArgumentsInArray: nil)
let marrStudentInfo : NSMutableArray = NSMutableArray()
if (resultSet != nil) {
while resultSet.next() {
let studentInfo : StudentInfo = StudentInfo()
studentInfo.RollNo = resultSet.stringForColumn("id")
studentInfo.Name = resultSet.stringForColumn("FirstName")
studentInfo.Marks = resultSet.stringForColumn("LastName")
marrStudentInfo.addObject(studentInfo)
}
}
sharedInstance.database!.close()
return marrStudentInfo
}
}
Now again follow the same step and create new file for that choose swift file à give name as “Util” and click on create button after file created add following code into “Util.swift” file.
import UIKit
class Util: NSObject {
class func getPath(fileName: String) -> String {
let documentsURL = NSFileManager.defaultManager().URLsForDirectory(.DocumentDirectory, inDomains: .UserDomainMask)[0]
let fileURL = documentsURL.URLByAppendingPathComponent(fileName)
return fileURL.path!
}
class func copyFile(fileName: NSString) {
let dbPath: String = getPath(fileName asString)
let fileManager = NSFileManager.defaultManager()
if !fileManager.fileExistsAtPath(dbPath) {
let documentsURL = NSBundle.mainBundle().resourceURL
let fromPath = documentsURL!.URLByAppendingPathComponent(fileName asString)
var error : NSError?
do {
try fileManager.copyItemAtPath(fromPath.path!, toPath: dbPath)
} catch let error1 asNSError {
error = error1
}
let alert: UIAlertView = UIAlertView()
if (error != nil) {
alert.title = "Error Occured"
alert.message = error?.localizedDescription
} else {
alert.title = "Successfully Copy"
alert.message = "Your database copy successfully"
}
alert.delegate = nil
alert.addButtonWithTitle("Ok")
alert.show()
}
}
class func invokeAlertMethod(strTitle: NSString, strBody: NSString, delegate: AnyObject?) {
let alert: UIAlertView = UIAlertView()
alert.message = strBody asString
alert.title = strTitle asString
alert.delegate = delegate
alert.addButtonWithTitle("Ok")
alert.show()
}
}
Now we will run and check the output of application. To run application, select the required simulator (Here we selected iPhone 6s Plus) and click on Play button, located at the top-left corner of the Xcode toolbar like as shown below.
Output of iOS SQLite App in Swift
Following is the result of iOS SQLite app. Now click on insert button it will take you to user form in that enter user details and click on save button like as shown below.
Once we enter details and click on save button that will take you to first screen where you can see the entered user details with Edit and Delete options. Now click on Delete button to delete record from tableview.
This is how we can use SQLite database in our iOS swift applications based on our requirements.