In this spring rest tutorial, learn to create REST APIs using Spring boot 2 framework which return JSON responses to client. In this Spring Boot 2 REST API tutorial, we will create two simple GET and POST APIs step by step and test them.
1. Maven dependencies
At first, create a simple maven web project and update following spring boot dependencies in pom.xml file.
The important dependencies are spring-boot-starter-parent (read more) and spring-boot-starter-web (read more). Starter web dependency transitively includes more dependencies to build a web application such as spring-webmvc, spring-web, hibernate-validator, tomcat-embed-core, tomcat-embed-el, tomcat-embed-websocket, jackson-databind, jackson-datatype-jdk8, jackson-datatype-jsr310 and jackson-module-parameter-names.
<?xml version="1.0" encoding="UTF-8"?> <modelVersion>4.0.0</modelVersion> <groupId>com.howtodoinjava.demo</groupId> <artifactId>springbootdemo</artifactId> <version>0.0.1-SNAPSHOT</version> <packaging>jar</packaging> <name>SpringBootDemo</name> <parent> <groupId>org.springframework.boot</groupId> <artifactId>spring-boot-starter-parent</artifactId> <version>2.0.5.RELEASE</version> <relativePath /> </parent> <properties> <project.build.sourceEncoding>UTF-8</project.build.sourceEncoding> <project.reporting.outputEncoding>UTF-8</project.reporting.outputEncoding> <java.version>1.8</java.version> </properties> <dependencies> <dependency> <groupId>org.springframework.boot</groupId> <artifactId>spring-boot-starter-web</artifactId> </dependency> <dependency> <groupId>org.springframework.boot</groupId> <artifactId>spring-boot-starter-test</artifactId> <scope>test</scope> </dependency> </dependencies> <build> <plugins> <plugin> <groupId>org.springframework.boot</groupId> <artifactId>spring-boot-maven-plugin</artifactId> </plugin> </plugins> </build></project> |
2. Spring Boot 2 REST API Controller
- In Spring, a controller class, which is capable of serving REST API requests, is called rest controller. It should be annotated with @RestController annotation.
- The resource uris are specified in @RequestMapping annotations. It can be applied at class level and method level both. Complete URI for an API is resolved after adding class level path and method level path.
- We should always write produces and consumes attributes to specify the mediatype attributes for the API. Never reply on assumptions.
In given controller, we have two API methods. Feel free to add more methods as needed.
- HTTP GET /employees – Returns list of the employees.
- HTTP POST /employees – Add an employee in the employees collection.
package com.howtodoinjava.rest.controller;import java.net.URI;import org.springframework.beans.factory.annotation.Autowired;import org.springframework.http.ResponseEntity;import org.springframework.web.bind.annotation.GetMapping;import org.springframework.web.bind.annotation.PostMapping;import org.springframework.web.bind.annotation.RequestBody;import org.springframework.web.bind.annotation.RequestMapping;import org.springframework.web.bind.annotation.RestController;import org.springframework.web.servlet.support.ServletUriComponentsBuilder;import com.howtodoinjava.rest.dao.EmployeeDAO;import com.howtodoinjava.rest.model.Employee;import com.howtodoinjava.rest.model.Employees;@RestController@RequestMapping(path = "/employees")public class EmployeeController { @Autowired private EmployeeDAO employeeDao; @GetMapping(path="/", produces = "application/json") public Employees getEmployees() { return employeeDao.getAllEmployees(); } @PostMapping(path= "/", consumes = "application/json", produces = "application/json") public ResponseEntity<Object> addEmployee(@RequestBody Employee employee) { Integer id = employeeDao.getAllEmployees().getEmployeeList().size() + 1; employee.setId(id); employeeDao.addEmployee(employee); URI location = ServletUriComponentsBuilder.fromCurrentRequest() .path("/{id}") .buildAndExpand(employee.getId()) .toUri(); return ResponseEntity.created(location).build(); }} |
We can control and customize a lots of implementation details using application.properties file. But to keep this demo simple, I am leaving it blank.
3. @SpringBootApplication
Our REST APIs skeleton is ready. Now we need to configure Spring to detect our rest controller (using auto scanning) and deploy apis in embedded tomcat server. Thankfully, Spring boot makes all these things very easy by using the concept of auto configuration.
Auto-configuration attempts to guess and configure beans we you are likely to need. Auto-configuration classes are usually applied based on the jars in application classpath and the beans we have defined additionally in @Configuration classes.
In this case, it does following things.
- It detects spring-webmvc so configure default spring mvc application beans. It help in scan and configure
@RestControllerand similar annotations. - It detects embed tomcat jars so configure embedded tomcat for us.
- It detects JSON jars so configure JSON support to APIs.
package com.howtodoinjava.rest;import org.springframework.boot.SpringApplication;import org.springframework.boot.autoconfigure.SpringBootApplication; @SpringBootApplicationpublic class SpringBootDemoApplication { public static void main(String[] args) { SpringApplication.run(SpringBootDemoApplication.class, args); }} |
4. Model classes and DAO
These classes are not directly related to REST. Still lets take a look how they have been written.
package com.howtodoinjava.rest.model;public class Employee { public Employee() { } public Employee(Integer id, String firstName, String lastName, String email) { super(); this.id = id; this.firstName = firstName; this.lastName = lastName; this.email = email; } private Integer id; private String firstName; private String lastName; private String email; //Getters and setters @Override public String toString() { return "Employee [id=" + id + ", firstName=" + firstName + ", lastName=" + lastName + ", email=" + email + "]"; }} |
package com.howtodoinjava.rest.model;import java.util.ArrayList;import java.util.List;public class Employees { private List<Employee> employeeList; public List<Employee> getEmployeeList() { if(employeeList == null) { employeeList = new ArrayList<>(); } return employeeList; } public void setEmployeeList(List<Employee> employeeList) { this.employeeList = employeeList; }} |
DAO class uses a static list to store data. Here we need to implement actual database interaction.
package com.howtodoinjava.rest.dao;import org.springframework.stereotype.Repository;import com.howtodoinjava.rest.model.Employee;import com.howtodoinjava.rest.model.Employees;@Repositorypublic class EmployeeDAO { private static Employees list = new Employees(); static { list.getEmployeeList().add(new Employee(1, "Lokesh", "Gupta", "howtodoinjava@gmail.com")); list.getEmployeeList().add(new Employee(2, "Alex", "Kolenchiskey", "abc@gmail.com")); list.getEmployeeList().add(new Employee(3, "David", "Kameron", "titanic@gmail.com")); } public Employees getAllEmployees() { return list; } public void addEmployee(Employee employee) { list.getEmployeeList().add(employee); }} |
5. Spring Boot REST Demo
To start the application, run the main() method in SpringBootDemoApplication class. It will start the embedded tomcat server. In server logs, you will see that API have been registered in spring context.
s.w.s.m.m.a.RequestMappingHandlerMapping : Mapped "{[/employees/],methods=[GET],produces=[application/json]}" onto public com.howtodoinjava.rest.model.Employees com.howtodoinjava.rest.controller. EmployeeController.getEmployees()s.w.s.m.m.a.RequestMappingHandlerMapping : Mapped "{[/employees/],methods=[POST], consumes=[application/json], produces=[application/json]}" onto public org.springframework.http.ResponseEntity <java.lang.Object> com.howtodoinjava.rest.controller. EmployeeController.addEmployee( com.howtodoinjava.rest.model.Employee ) |
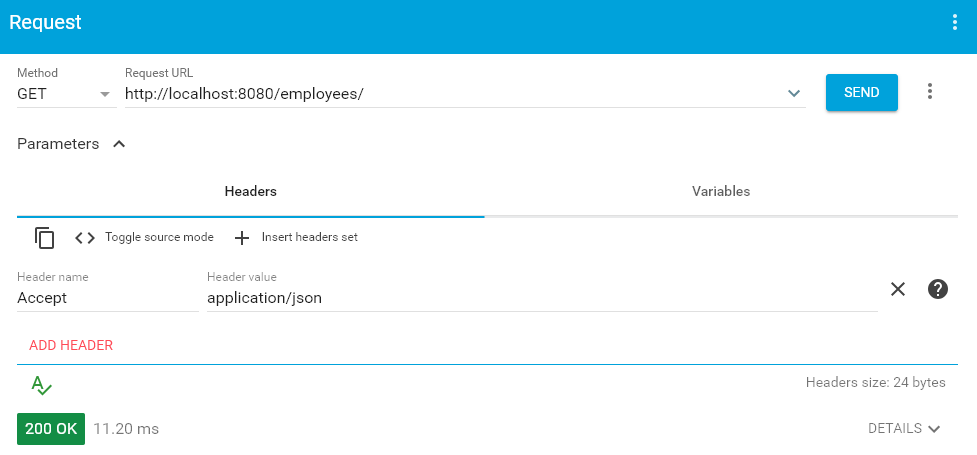
5.1. HTTP GET /employees
Once server is UP, access the API using some rest client.

{ "employeeList": [ { "id": 1, "firstName": "Lokesh", "lastName": "Gupta", "email": "howtodoinjava@gmail.com" }, { "id": 2, "firstName": "Alex", "lastName": "Kolenchiskey", "email": "abc@gmail.com" }, { "id": 3, "firstName": "David", "lastName": "Kameron", "email": "titanic@gmail.com" } ],} |
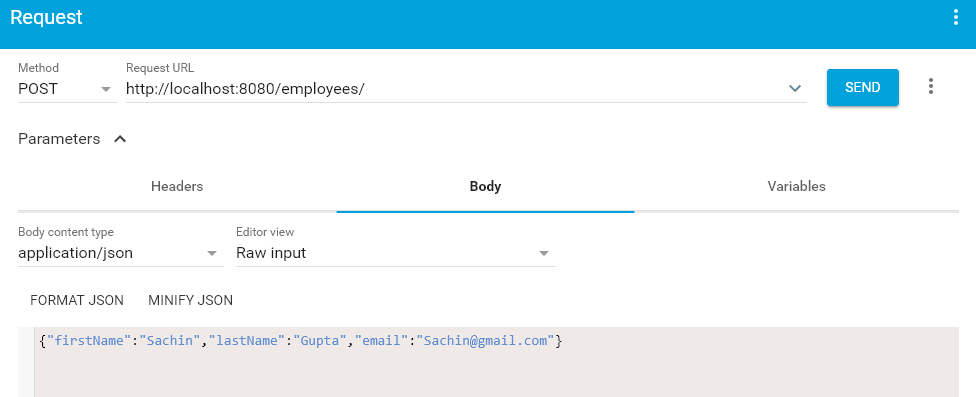
5.2. HTTP POST /employees

location: http://localhost:8080/employees/4content-length: 0date: Sat, 06 Oct 2018 04:33:37 GMT |
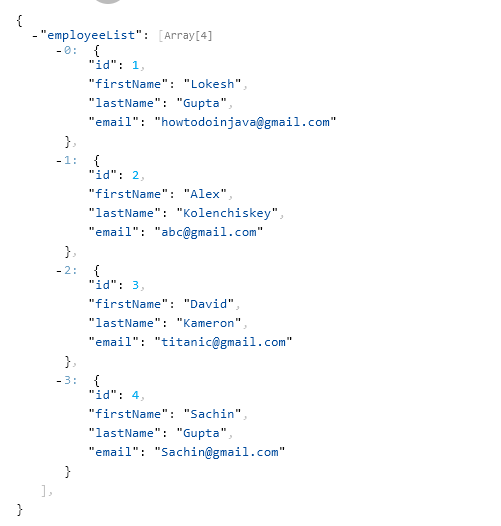
Hit the GET request again and this time we will get the added employee as well.

6. More examples
- Spring @Controller and @RestController Annotations
Let me know if you have query in this spring boot restful web services json example.
No comments:
Post a Comment