Learn to configure H2 database with Spring boot to create and use an in-memory database in runtime, generally for unit testing or POC purposes. Remember an in-memory database is created/initialized when an application starts up; and destroyed when the application shuts down.
1. What is H2 Database?
H2 is one of the popular in-memory databases written in Java. It can be embedded in Java applications or run in the client-server mode.
Spring Boot provides excellent integration support for H2 using simple properties configuration.
To make it even more useful, H2 also provides a console view to maintain and interact with the database tables and data.
2. Maven Dependency
To use H2 in Spring boot application, all we need to do is adding H2 runtime jar into dependencies. The best way to add is through maven.
<dependency> <groupId>com.h2database</groupId> <artifactId>h2</artifactId> <scope>runtime</scope></dependency> |
3. H2 Configuration Options
3.1. Simple configuration
Spring provides very easy configuration options to connect to any database using simple properties. Below are the configuration properties, we shall have in application.properties file.
spring.datasource.url=jdbc:h2:mem:testdbspring.datasource.driverClassName=org.h2.Driverspring.datasource.username=saspring.datasource.password=spring.jpa.database-platform=org.hibernate.dialect.H2Dialect |
Please note by default, Spring Boot configures the in-memory database connection with the username 'sa' and an empty password ' '. If you wish to change these values, override them in above properties options.
3.2. Configure data persistence
The in-memory databases are volatile, by default, and all stored data will be lost when we restart the application. In this case, data is written in temporary memory and as soon as JVM is stopped, data is flushed.
To have a persistent data store, which is capable to storing data between application start/stop, we should store the data in files. For this change the spring.datasource.url property.
# temporary data storagespring.datasource.url = jdbc:h2:mem:testdb# temporary data storagespring.datasource.url = jdbc:h2:file:/data/samplespring.datasource.url = jdbc:h2:file:C:/data/sample (Windows only) |
4. Create schema and insert data on initialization
We may want to initialize database with some fixed schema (DDL) and insert default data (DML) into tables before the application is ready is run business usecases.
We can achieve this by putting sql files into resources folder (/src/main/resources/).
- schema.sql – To initialize the schema ie.create tables and dependencies.
- data.sql – To insert default data rows.
DROP TABLE IF EXISTS TBL_EMPLOYEES; CREATE TABLE TBL_EMPLOYEES ( id INT AUTO_INCREMENT PRIMARY KEY, first_name VARCHAR(250) NOT NULL, last_name VARCHAR(250) NOT NULL, email VARCHAR(250) DEFAULT NULL); |
INSERT INTO TBL_EMPLOYEES (first_name, last_name, email) VALUES ('Lokesh', 'Gupta', 'abc@gmail.com'), ('Deja', 'Vu', 'xyz@email.com'), ('Caption', 'America', 'cap@marvel.com'); |
5. H2 Console
5.1. Enable H2 console
By default, the console view of H2 database is disabled. We must enable it to view and access it in browser. Note that we can customize the URL of H2 console which, by default, is '/h2'.
# Enabling H2 Consolespring.h2.console.enabled=true# Custom H2 Console URLspring.h2.console.path=/h2 |
5.2. Accessing H2 console
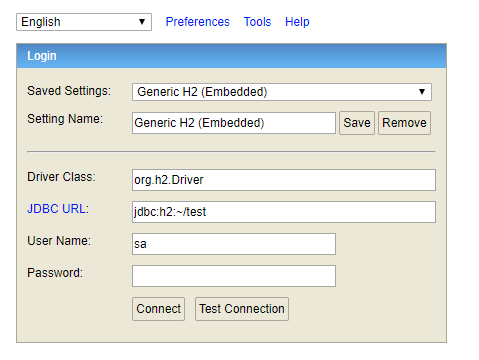
Start the spring boot application and access the console in browser with URL : http://localhost:8080/h2.
We can see the console like this.

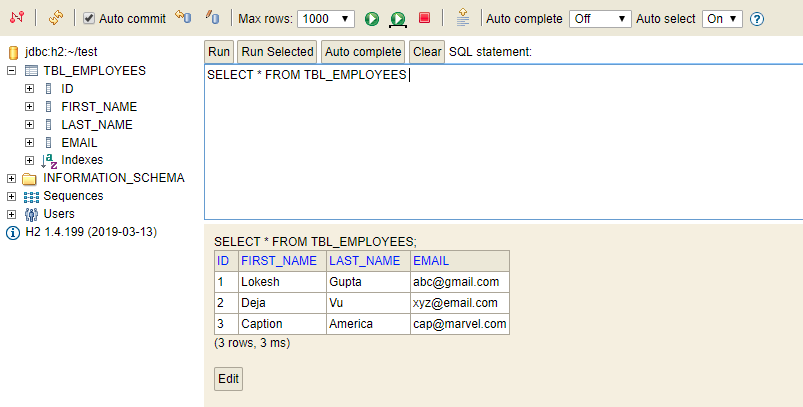
Now enter the configured username and password. We can verify the table structure and default data inserted through SQL files.

5.3. Other configuration options
Spring boot provides two more properties to further customize the behavior of H2 console. i.e. we can enable/disable the database trace logs and we can enable/disable the remote access of H2 console.
By default both properties are false.
# Whether to enable trace output.spring.h2.console.settings.trace=false# Whether to enable remote access.spring.h2.console.settings.web-allow-others=false |
Use these properties as per requirements at hands.
6. Conclusion
In this Spring boot with H2 database tutorial, we learned to configure, initialize and access H2 database through an spring boot application using simple properties configuration options.
No comments:
Post a Comment