We can use the Gradle's Build Init plugin to create a new Java application that tracks Gradle conventions. Build plugin provides a task, called as init, which generates the project. The plugin also uses the wrapper task to create a Gradle wrapper script (gradlew).
To create a Java application with Gradle, follow the below steps:
Step1: The first step is creating a directory for a new project and change directory to it.
Follow the below command to create a directory called Java_application:
Follow the below command to change the command line directory to it:
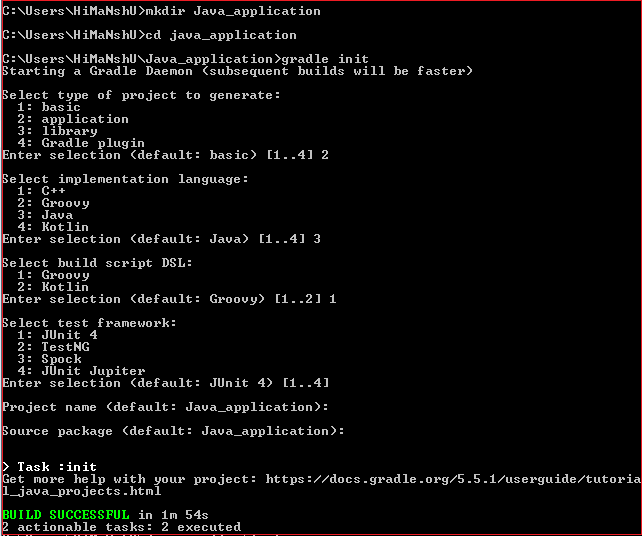
step2: Run the init command to create a new Gradle project:
Step3: Select the project type that you want to generate. There are four command-line options available, which are as follows:
- basic
- application
- library
- Gradle plugin
Type 2 and press enter key to create an application. The default selection is basic.
Step 4: Select the implementation language. There are five options available, which are as follows:
- C++
- Groovy
- Java
- Kotlin
- Swift
Type 3 and press Enter key for Java. The default selection is Java.
Step 5: The next step is to select the default build script language for the project. There are two options available, which are as follows:
- Groovy
- Kotlin
Type 1 and press Enter key for Groovy. The default selection is Groovy.
Step6: Select the test framework. There are four options available for the testing framework. They are as follows:
- JUnit 4
- TestNG
- Spock
- JUnit Jupiter
Enter your choice. The default selection is JUnit 4.
Step7: Enter the project name; by default it will take the directory name as the project name.
Step8: Enter the source package; by default it will take the directory name as a source package.
Now the init task is successfully executed, and we have created a Java application using Gradle Init API.
Consider the below output:
The init task itself contains wrapper task, so at first, it executes the wrapper task that generates gradlew and gradlew.bat files (Wrapper scripts) in our repository. It creates a Gradle project with the following structure:
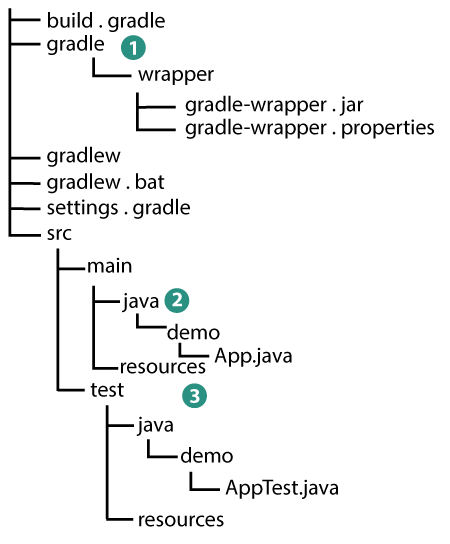
The above structure describes:
- A generated wrapper package that contains the wrapper files.
- Default Java Source folder
- Default Java test folder
Generated files
Let's have a look at the generated files of the project.
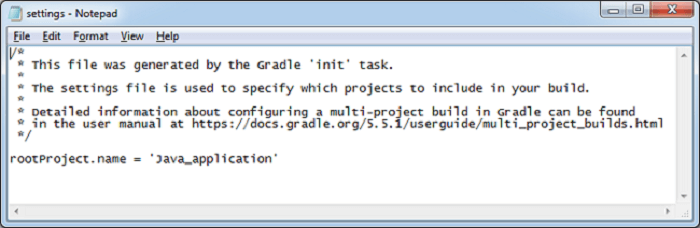
- gradle:
It is heavily commented and has only one active line. It sets the name of the root project.
It will use the default behavior of naming the project after the directory in which it is available. It looks like:
- gradle:
It is the build script of the Gradle project. The generated build.gradle file has many components. The used dependencies and their versions are introduced in this build script. The content of the generated build file is as follows:
The Gradle build script adds the Java and application plugins. When we run a gradle command, it will search in Gradle's build script.
- java:
Gradle supports Java projects and contains a class that having the main method, which can be executed from the command line. In the Java_Application, the name of the main class is App.
The file App.java takes place in the directory Java_application\src\main\java\Java_application. The generated code of App.java is as following:
The above Java source file is generated by init task.
- Java:
It is the test class of the Java project. The test class takes place in the directory Java_application\src\test\java\Java_application. The generated code of the AppTest.java is as following:
The init task generates the given Java test file. The generated test file contains a single test annotated with @test annotation of JUnit. This test instantiates the App class, invokes the getGreeting(), and checks that the returned value is not null.
Execution of the build
To execute a gradle build, run the build task along with gradlew command. However, we can run the gradle task, but it is good to include the wrapper script.
Output:

The build task compiles the classes, runs the tests, and creates the test reports.
Note: The first time we run the gradlew command, it may take some time, while the specified version of gradle is downloaded and stored locally.
The Gradle wrapper script checks whether we have specified the Guava and JUnit libraries or not, if not, then it will download and store it in the /.gradle directory.
Run the Java Application
The gradle build uses the application plugin so we can run the application from the command line. The gradlew run command will be used to run the application from the command line.
First, use the task command to display the added tasks by the plugin:
The above command will list the available tasks in the project. consider the below snap of Output:
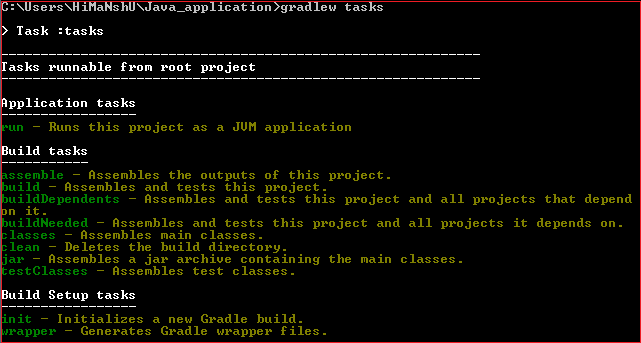
Now, run the application by using the run command. It will convey Gradle to execute the main method in the class assigned to the mainClassName property.
Output:
Hello world.


No comments:
Post a Comment