In android, Rotate animation is used to change the appearance and behaviour of the objects over a particular interval of time. The Rotate animation will provide a better look and feel for our applications.
Generally, the animations are useful when we want to notify users about the change’s happening in our app, such as new content loaded or new actions available, etc.
To create an animation effect to the objects in our android application, we need to follow below steps.
Create XML File to Define Animation
We need to create an xml file that defines the type of animation to perform in a new folder anim under res directory (res à anim à rotate.xml) with required properties. In case anim folder not exists in res directory, create a new one.
To use Rotate animation in our android applications, we need to define a new xml file with <rotate> tag like as shown below.
To Rotate animation in Clockwise, we need to set android:fromDegrees and android:toDegrees property values and these will defines a rotation angles like as shown below.
<?xml version="1.0" encoding="utf-8"?><set xmlns:android="http://schemas.android.com/apk/res/android" android:interpolator="@android:anim/cycle_interpolator">
<rotate android:fromDegrees="0"
android:toDegrees="360"
android:pivotX="50%"
android:pivotY="50%"
android:duration="5000" />
</set>
<rotate android:fromDegrees="0"
android:toDegrees="360"
android:pivotX="50%"
android:pivotY="50%"
android:duration="5000" />
</set>
To Rotate animation in Anti Clockwise, we need to set android:fromDegrees and android:toDegrees property values and these will defines a rotation angles like as shown below.
<?xml version="1.0" encoding="utf-8"?><set xmlns:android="http://schemas.android.com/apk/res/android" android:interpolator="@android:anim/cycle_interpolator">
<rotate android:fromDegrees="360"
android:toDegrees="0"
android:pivotX="50%"
android:pivotY="50%"
android:duration="5000" />
</set>
<rotate android:fromDegrees="360"
android:toDegrees="0"
android:pivotX="50%"
android:pivotY="50%"
android:duration="5000" />
</set>
Once we are done with creation of required animation XML files, we need to load those animation files using different properties.
Android Load and Start the Animation
In android, we can perform animations by using AnimationUtils component methods such as loadAnimation(). Following is the code snippet of loading and starting an animation using loadAnimation() and startAnimation() methods.
ImageView img = (ImageView)findViewById(R.id.imgvw);
Animation aniRotate = AnimationUtils.loadAnimation(getApplicationContext(),R.anim.rotate_clockwise);img.startAnimation(aniRotate);
If you observe above code snippet, we are adding an animation to the image using loadAnimation() method. The second parameter in loadAnimation() method is the name of our animation xml file.
Here we used another method startAnimation() to apply the defined animation to imageview object.
Now we will see how to implement rotate animation for imageview on button click in android applications with examples.
Android Rotate Animation Example
Following is the example of implementing a rotate animations to rotate images in clockwise or anti clockwise on button click in android applications.
Create a new android application using android studio and give names as RotateExample. In case if you are not aware of creating an app in android studio check this article Android Hello World App.
Once we create an application, open activity_main.xml file from \res\layout folder path and write the code like as shown below.
activity_main.xml
<?xml version="1.0" encoding="utf-8"?><RelativeLayout xmlns:android="http://schemas.android.com/apk/res/android"
android:layout_width="match_parent"
android:layout_height="match_parent"
android:paddingLeft="10dp"
android:paddingRight="10dp">
<ImageView android:id="@+id/imgvw"
android:layout_width="wrap_content"
android:layout_height="250dp"
android:src="@drawable/bangkok"/>
<Button
android:id="@+id/btnRClk"
android:layout_below="@+id/imgvw"
android:layout_width="wrap_content"
android:layout_height="wrap_content"
android:text="Clockwise" android:layout_marginLeft="100dp" />
<Button
android:id="@+id/btnRAClk"
android:layout_width="wrap_content"
android:layout_height="wrap_content"
android:layout_alignBottom="@+id/btnRClk"
android:layout_toRightOf="@+id/btnRClk"
android:text="Anti Clockwise" />
</RelativeLayout>
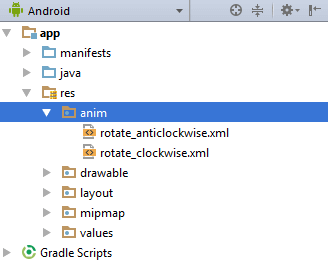
As discussed, we need to create an xml files to define rotate animation either in clockwise or anti clockwise in new folder anim under res directory (res à anim à rotate_clockwise.xml, rotate_anticlockwise.xml) with required properties. In case anim folder not exists in res directory, create a new one.
Following is the example of creating an XML files (rotate_clockwise.xml, rotate_anticlockwise.xml) under anim folder to define rotate animation in clockwise and anti-clockwise properties.

Now open rotate_clockwise.xml file and write the code to set rotate animation properties to rotate the object in clockwise like as shown below.
rotate_clockwise.xml
<?xml version="1.0" encoding="utf-8"?><set xmlns:android="http://schemas.android.com/apk/res/android" android:interpolator="@android:anim/cycle_interpolator">
<rotate android:fromDegrees="0"
android:toDegrees="360"
android:pivotX="50%"
android:pivotY="50%"
android:duration="5000" />
</set>
<rotate android:fromDegrees="0"
android:toDegrees="360"
android:pivotX="50%"
android:pivotY="50%"
android:duration="5000" />
</set>
Now open rotate_anticlockwise.xml file and write the code to set rotate animation properties to rotate the object in anti-clockwise like as shown below
rotate_anticlockwise.xml
<?xml version="1.0" encoding="utf-8"?><set xmlns:android="http://schemas.android.com/apk/res/android" android:interpolator="@android:anim/cycle_interpolator">
<rotate android:fromDegrees="360"
android:toDegrees="0"
android:pivotX="50%"
android:pivotY="50%"
android:duration="5000" />
</set>
<rotate android:fromDegrees="360"
android:toDegrees="0"
android:pivotX="50%"
android:pivotY="50%"
android:duration="5000" />
</set>
Now open your main activity file MainActivity.java from \java\com.tutlane.rotateexample path and write the code like as shown below
MainActivity.java
package com.tutlane.rotateexample;import android.support.v7.app.AppCompatActivity;import android.os.Bundle;import android.view.View;import android.view.animation.Animation;import android.view.animation.AnimationUtils;import android.widget.Button;import android.widget.ImageView;
public class MainActivity extends AppCompatActivity {
private Button btnrclock;
private Button btnrantick;
private ImageView img;
@Override
protected void onCreate(Bundle savedInstanceState) {
super.onCreate(savedInstanceState);
setContentView(R.layout.activity_main);
btnrclock = (Button)findViewById(R.id.btnRClk);
btnrantick = (Button)findViewById(R.id.btnRAClk);
img = (ImageView)findViewById(R.id.imgvw);
btnrclock.setOnClickListener(new View.OnClickListener() {
@Override
public void onClick(View v) {
Animation aniRotateClk = AnimationUtils.loadAnimation(getApplicationContext(),R.anim.rotate_clockwise);
img.startAnimation(aniRotateClk);
}
});
btnrantick.setOnClickListener(new View.OnClickListener() {
@Override
public void onClick(View v) {
Animation animRotateAclk = AnimationUtils.loadAnimation(getApplicationContext(),R.anim.rotate_anticlockwise);
img.startAnimation(animRotateAclk);
}
});
}
}
If you observe above code, we are adding an animation to the image using loadAnimation() method used startAnimation() method to apply the defined animation to imageview object.
Output of Android Rotate Animation Example
When we run above program in android studio we will get the result like as shown below.

If you observe above result, whenever we are clicking on Clockwise or Anti Clockwise buttons, the image will rotate either in clockwise or anti clockwise based on our functionality.
This is how we can implement rotate animations for imageview in android applications based on our requirements.
No comments:
Post a Comment